In today’s digital ecosystem, website security is paramount. The use of SSL/TLS certificates encrypts communications between users and servers, ensuring the confidentiality and integrity of exchanged data. A wildcard certificate, in particular, provides the flexibility to secure a primary domain and all its subdomains, making it indispensable for businesses with extensive and diversified web presence.
In this article, we will explore how to generate a wildcard certificate using OVH, one of the leading hosting service providers, and Let’s Encrypt, a free, automated, and open certificate authority. We will cover each step of the process, from initial setup to final implementation, including potential challenges and their solutions. Whether you are a seasoned system administrator or a developer looking to enhance the security of your projects, this guide will provide you with the necessary knowledge to effectively implement wildcard certificates without hassle. Let’s dive into the world of SSL/TLS certificates and discover how to protect your domain and its subdomains with OVH and Let’s Encrypt.
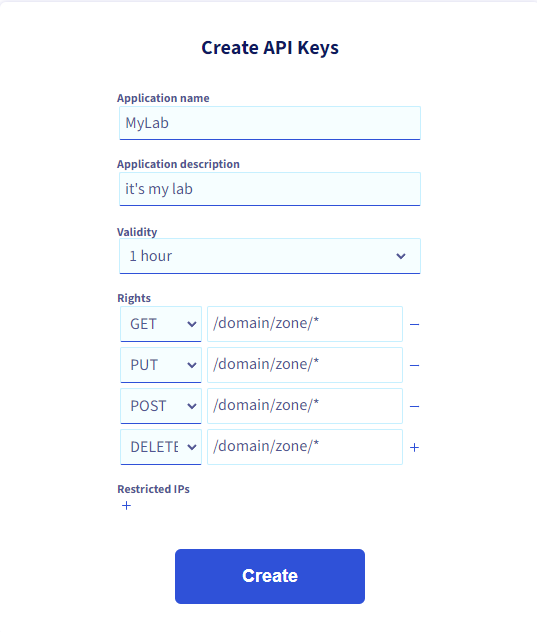
Token Creation
It is necessary to grant Let’s Encrypt the rights to manage our DNS for this action. To do this, we will generate a token.
Go to https://www.ovh.com/auth/api/createToken and authenticate yourself.
Enter the information as shown in the image and click on Create.
As output, you will have 3 pieces of information to keep, the two keys, and the secret. We will use them later on.
Certificate Generation
I advise you to perform the manipulations on a dedicated Linux machine.
Install the necessary packages.
apt install python3-pip && apt install certbot && apt install python3-certbot-dns-ovhThen create the file that will contain the keys and the secret.
nano /root/.ovhapiAdd the following to this file, making sure to adjust it according to the token generated earlier.
dns_ovh_endpoint = ovh-eu
dns_ovh_application_key = XXXXXXXXXXX
dns_ovh_application_secret = XXXXXXXXXXXX
dns_ovh_consumer_key = XXXXXXXXXXXX
Modify the permissions so that the file can be used when executing the certificate request command.
chmod 600 /root/.ovhapiAnd send the certificate request (adjust with your domain and email).
certbot certonly --dns-ovh --dns-ovh-credentials ~/.ovhapi -d mysite.com -d *.mysite.com
--dns-ovh-propagation-seconds 240 --non-interactive --agree-tos --email admin@mysite.com
This action takes several minutes. When it is complete, all the data will be downloaded into /etc/letsencrypt/live/strangerping.com/