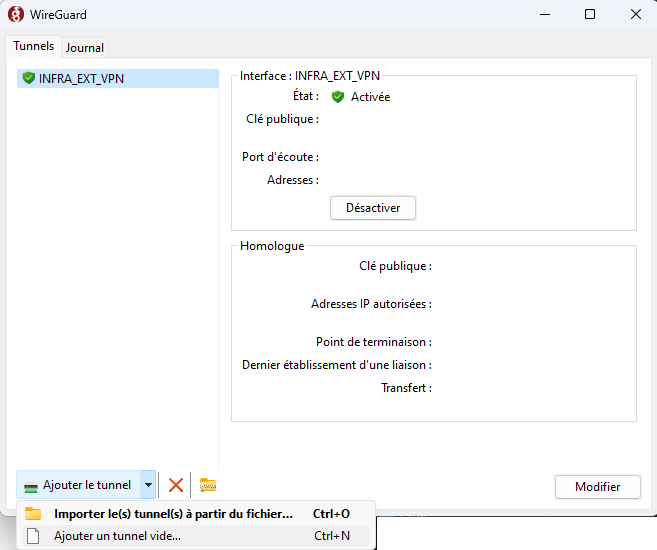
WireGuard is a very lightweight and easy-to-configure VPN that operates on a P2P system. It is available on many platforms like Windows or Android and is incredibly stable!

We start by installing the required packages: WireGuard for the VPN, IPtables for filtering and primarily for NATing the flow, and IPtables-persistent to make the IPtables configuration persistent after a system reboot.
apt-get install wireguard iptables iptables-persistentWe will create the directory /opt/wireguard-keys to store the keys in.
mkdir /opt/wireguard-keysGo to the directory we just created.
cd /opt/wireguard-keysThen we generate the private and public keys.
wg genkey | tee privatekey | wg pubkey > publickeyTo secure our keys, we modify the permissions of the folder and its content.
chmod -R 600 /opt/wireguard-keysWe display the keys that we just generated; the private key will be used in the configuration of our WireGuard server and the public one will be used during client configuration.
cat privatekey
cat publickey
To configure WireGuard, we will create and edit the wg0.conf file
nano /etc/wireguard/wg0.conf[Interface]
Address = 10.10.10.1/24
SaveConfig = true
ListenPort = 51820
PrivateKey = server_generated_private_key
[Peer]
PublicKey = client_generated_public_key
AllowedIPs = 10.10.10.0/24
Explanation:
- Address
This is the IP address of the VPN interface on the server side. - SaveConfig
Indicates that the interface configuration should be saved. - ListenPort
Defines the network port for the WireGuard service. - PrivateKey
Should be set to the private key that was generated on the server. - PublicKey
Should be set to the public key that was generated on the client (We will come back to modify this value later in the tutorial after generating this key). - AllowedIPs
Defines the IP addresses that will be routed through the VPN tunnel to the client.
Now that the interface is configured, we will enable it at startup. At this point, there is no need to start it now as we will come back to configure the client’s public key later.
systemctl enable wg-quick@wg0We are now configuring IPtables.
To avoid getting confused with the commands, we will simply edit the persistence file rules.v4 because we will reboot the server later to confirm that the VPN comes up properly and that everything is functional after a reboot.
nano /etc/iptables/rules.v4*filter
*filter
:INPUT DROP [0:0]
:FORWARD DROP [0:0]
:OUTPUT ACCEPT [0:0]
-A INPUT -m conntrack --ctstate ESTABLISHED,RELATED -j ACCEPT
-A FORWARD -m conntrack --ctstate ESTABLISHED,RELATED -j ACCEPT
-A INPUT -i lo -j ACCEPT
-A INPUT -p tcp --dport 22 -j ACCEPT
-A INPUT -p udp --dport 51820 -j ACCEPT
-A INPUT -i wg0 -j ACCEPT
-A FORWARD -i wg0 -j ACCEPT
-A FORWARD -o wg0 -j ACCEPT
COMMIT
*nat
:PREROUTING ACCEPT [0:0]
:INPUT ACCEPT [0:0]
:OUTPUT ACCEPT [0:0]
:POSTROUTING ACCEPT [0:0]
-A POSTROUTING -o ens18 -j MASQUERADE
COMMIT
This is a basic configuration of IPtables, feel free to refine it to make it more secure.
Since our WireGuard server will perform routing, we enable the forward function by uncommenting the corresponding line and ensuring the value is set to 1.
nano /etc/sysctl.conf
net.ipv4.ip_forward=1
We will return to the server after configuring the client.
In this example, I am using a Windows client, but it works just as well on mobile or Linux; the configurations are the same.
After installing and launching the WireGuard client, click on the small arrow next to “Add Tunnel” located at the bottom left.
You will notice that when the tunnel addition window opens, a public and private key are automatically generated.
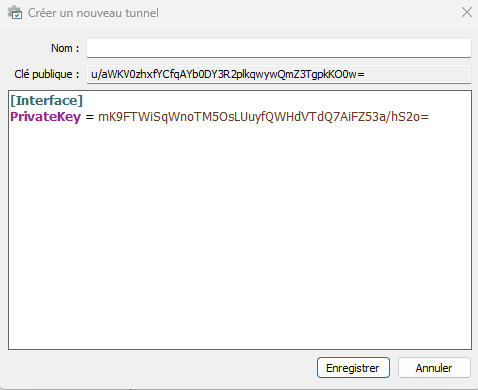
We will modify all this by:
[Interface]
PrivateKey = mK9FTWiSqWnoTM5OsLUuyfQWHdVTdQ7AiFZ53a/hS2o=
Address = 10.10.10.5/24

[Peer]
PublicKey = public_key_generated_on_server
AllowedIPs = 10.10.10.0/24, 192.168.1.0/24, 172.16.1.0/24
Endpoint = PUBLIC-IP:51820
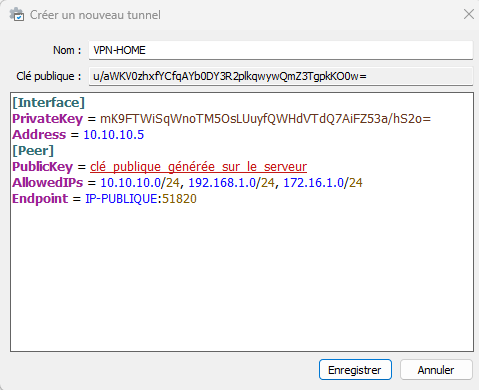
Explanation:
- PrivateKey Should have the value of the private key that was generated by the client (done automatically)
- Address This is the IP address of the VPN interface on the client side
- PublicKeys Should have the value of the public key that was generated on the server
- AllowedIPs Defines the IP addresses that will be routed through the VPN tunnel to the server. I put multiple addresses to understand that it is possible to connect to multiple networks via this tunnel
- Endpoint Defines the address to which the client should connect when starting and the port configured on the server previously
You’ll notice there is a greyed-out field labeled “Public Key”; this was automatically generated when opening the tunnel creation window. You need to copy this key to the server.
nano /etc/wireguard/wg0.conf[Interface]
Address = 10.10.10.1/24
SaveConfig = true
ListenPort = 51820
PrivateKey = private_key_generated_on_server
[Peer]
PublicKey = public_key_generated_on_client
AllowedIPs = 10.10.10.0/24
All that’s left is to restart the server, and everything should be functional.
reboot