The world of Linux is fascinating, and security is a crucial chapter of this journey. Fail2Ban is one of those essential tools for any Linux administrator concerned about protecting their servers. By monitoring system logs, it detects intrusion attempts on services such as SSH, HAProxy, or Postfix. And if an intruder becomes too persistent? Fail2Ban steps in, blocking the offender’s IP address via IPTables. One of the major strengths of Fail2Ban is its flexibility. You can create and tailor your own filters according to your needs. In this article, I will guide you through the installation and configuration of Fail2Ban on Debian.
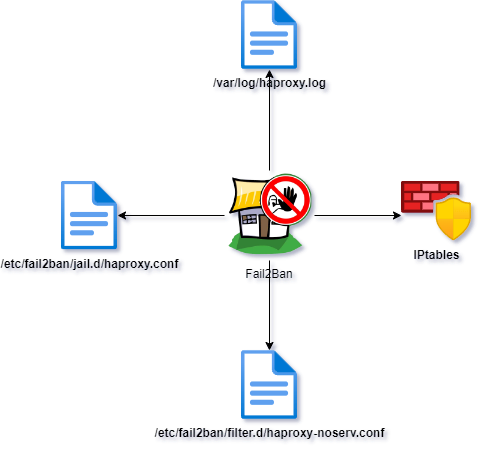
Operation of Fail2ban in 5 steps:
1. Monitoring: Fail2Ban continuously scans log files.
2. Detection: It identifies suspicious activities based on established rules.
3. Consultation: Before taking action, it checks if the offending IP is already listed in its “jail”.
4. Transmission: If the IP is deemed malicious, it is sent to IPTables.
5. Blocking: IPTables takes over and blocks the concerned IP address.
We start by installing the necessary packages.
apt-get update
apt-get install fail2ban iptables iptables-persistent
Then we configure IPtables to avoid blocking the flows we use. In this example, I won’t dwell too much on the rules or do something advanced like SSH filtering by source IP.
We set the default rules for the INPUT, FORWARD, and OUTPUT chains:
iptables -P INPUT ACCEPT

iptables -P FORWARD ACCEPT

iptables -P OUTPUT ACCEPT
Next, we need to allow traffic on the ports in use.
For an Apache or HAproxy server: 22 (SSH), 80 (HTTP) and 443 (HTTPS)
iptables -A INPUT -p tcp --dport 22 -j ACCEPT

iptables -A INPUT -p tcp --dport 80 -j ACCEPT

iptables -A INPUT -p tcp --dport 443 -j ACCEPT
Very important, we also need to allow traffic for already established or related connections. It took me quite some time to understand why my DNS flow wasn’t coming back…
iptables -I INPUT -m state --state ESTABLISHED,RELATED -j ACCEPTThen, finally, we block all other incoming traffic:
iptables -A INPUT -j DROPOnce you have configured IPtables as desired, you can save the current configuration so that it persists after the server restarts.
iptables-save > /etc/iptables/rules.v4We list all the rules to ensure that they have been taken into account.
iptables -L -n -vNow, we’re going to set up a Fail2Ban rule. The filtering rules are stored in /etc/fail2ban/filter.d/, but it’s also possible to create custom ones based on your needs.
Thus, we’ll create a rule for HAproxy to protect against <NOSRV> attempts.
So, we create the configuration file haproxy-noserv.conf.
nano /etc/fail2ban/filter.d/haproxy-noserv.confAnd then, we add our new rule:
[Definition]

failregex = ^.*haproxy\[\d+\]: <HOST>:\d+ \[\.*\] http_fe http_fe/<NOSRV> .*

ignoreregex =
Now that the filtering rule is added, we will define the conditions and actions of it in what’s called the jail (Jail).
We create a new file named haproxy.conf.
nano /etc/fail2ban/jail.d/haproxy.confAnd we add the parameters:
[haproxy-noserv]
enabled = true
filter = haproxy-noserv
action = iptables-allports sendmail-whois[name=Haproxy-noserv, dest=mail@mydomain.com]
bantime = 72000
maxretry = 4
findtime = 6000
logpath = /var/log/haproxy.log
ignoreip = 127.0.0.0/8 10.10.10.1/16
Some explanations:
-
- [haproxy-noserv]
This defines the name of the “jail” in Fail2Ban. Each jail corresponds to a specific configuration to monitor a specific service or log.
- [haproxy-noserv]
-
- enabled = true
This line activates the jail. If set tofalse, the jail will not be used even if it is configured.
- enabled = true
-
- filter = haproxy-noserv
This indicates the filter to use for this jail. This is the filter we created earlier that contains the necessary regular expressions to parse the logs and identify suspicious behaviors.
- filter = haproxy-noserv
-
- action = iptables-allports
This line defines the actions to take when an IP is banned. Here,iptables-allportsblocks traffic on all ports for the banned IP.
- action = iptables-allports
-
- bantime = 72000
Duration (in seconds) for which an IP will be banned. Here, it is set to 72000 seconds, or 20 hours.
- bantime = 72000
-
- maxretry = 4
Number of attempts allowed before an IP is banned. Here, after 4 attempts, the IP will be banned.
- maxretry = 4
-
- findtime = 6000
Duration (in seconds) during which Fail2Ban counts attempts. In this case, if an IP makes 4 attempts (or more) in less than 6000 seconds (i.e., 1 hour 40 minutes), it will be banned.
- findtime = 6000
-
- logpath = /var/log/haproxy.log
Path of the log file that Fail2Ban should monitor for this jail.
- logpath = /var/log/haproxy.log
-
- ignoreip = 127.0.0.0/8 10.10.10.1/16
List of IP addresses or IP address ranges that should never be banned. Here, it ignores all local IPs (127.0.0.0/8) and a specific range (10.10.10.1/16).
- ignoreip = 127.0.0.0/8 10.10.10.1/16
We now need to reload Fail2Ban.
systemctl restart fail2ban.serviceWith the following command, we can list the active jails.
fail2ban-client statusTo see more details on a particular jail, we will use the same command but add the filtering rule at the end.
fail2ban-client status haproxy-noservSo, we can appreciate the result and confirm that it works!
Status for the jail: haproxy-noserv
|- Filter
|  |- Currently failed: 4
|  |- Total failed:     65
|  `- File list:        /var/log/haproxy.log
`- Actions
   |- Currently banned: 5
   |- Total banned:     8
   `- Banned IP list:   XXX.XXX.XXX.XXX XXX.XXX.XXX.XXX XXX.XXX.XXX.XXX XXX.XXX.XXX.XXX XXX.XXX.XXX.XXX
You’ll notice that my filter has banned 8 addresses of which 5 are still in jail and which I’ve anonymized, of course…